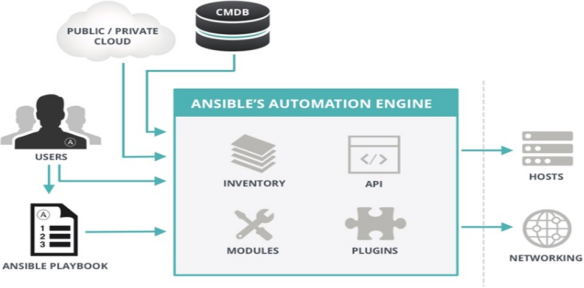
一. Ansible简介
Ansible是新出现的自动化运维工具,基于Python开发,集合了众多运维工具(puppet、cfengine、chef、func、fabric)的优点,实现了批量系统配置、批量程序部署、批量运行命令等功能。
ansible是基于模块工作的,本身没有批量部署的能力。真正具有批量部署的是ansible所运行的模块,ansible只是提供一种框架。主要包括:
- 连接插件connection plugins:负责和被监控端实现通信;
- host inventory:指定操作的主机,是一个配置文件里面定义监控的主机;
- 各种模块核心模块、command模块、自定义模块;
- 借助于插件完成记录日志邮件等功能;
- playbook:剧本执行多个任务时,非必需可以让节点一次性运行多个任务。
二.Ansbile架构

- INVENTORY:Ansible 管 理 主 机 的 清 单 /etc/anaible/hosts
- MODULES:Ansible执行命令的功能模块,多数为内置核心模块,也可自定义
- PLUGINS:模块功能的补充,如连接类型插件、循环插件、变量插件、过滤插件等
- API:供第三方程序调用的应用程序编程接口
三.Ansible安装
ansible的安装方法有多种
官方文档
https://docs.ansible.com/ansible/latest/installation_guide/intro_installation.ht ml
- ubuntu18.04安装
[root@ubuntu1804 ~]# apt update
[root@ubuntu1804 ~]# apt install software-properties-common
[root@ubuntu1804 ~]# apt-add-repository --yes --update ppa:ansible/ansible
[root@ubuntu1804 ~]# apt install ansible
[root@ubuntu1804 ~]# ansible --version ansible 2.9.17
config file = /etc/ansible/ansible.cfg
configured module search path = [u'/root/.ansible/plugins/modules',u'/usr/share/ansible/plugins/modules']
ansible python module location = /usr/lib/python2.7/dist-packages/ansible executable location = /usr/bin/ansible
python version = 2.7.17 (default, Sep 30 2020, 13:38:04) [GCC 7.5.0]
- Centos安装
[root@centos8 ~]# yum install ansible -y
[root@centos8 ~]# ansible --version ansible 2.9.16
config file = /etc/ansible/ansible.cfg
configured module search path = ['/root/.ansible/plugins/modules', '/usr/share/ansible/plugins/modules']
ansible python module location = /usr/lib/python3.6/site-packages/ansible executable location = /usr/bin/ansible
python version = 3.6.8 (default, Apr 16 2020, 01:36:27) [GCC 8.3.1 20191121
(Red Hat 8.3.1-5)]
- pip安装
[root@centos7 ~]#yum install python-pip
[root@centos7 ~]#pip install	--upgrade pip
[root@centos7 ~]#pip install ansible --upgrade
[root@centos7 ~]#ansible --version
/usr/lib64/python2.7/site-packages/cryptography/ init .py:39: CryptographyDeprecationWarning: Python 2 is no longer supported by the Python core team. Support for it is now deprecated in cryptography, and will be removed in a future release.
CryptographyDeprecationWarning, ansible 2.9.12
config file = None
configured module search path = [u'/root/.ansible/plugins/modules',u'/usr/share/ansible/plugins/modules']
ansible python module location = /usr/lib/python2.7/site-packages/ansible executable location = /usr/bin/ansible
python version = 2.7.5 (default, Apr	2 2020, 13:16:51) [GCC 4.8.5 20150623
(Red Hat 4.8.5-39)]
四.Ansible相关文件
4.1 配置文件
- /etc/ansible/ansible.cfg 主配置文件,配置ansible工作特性,也可以在项目的目录中创建此文件, 当前目录下如果也有ansible.cfg,则此文件优先生效,建议每个项目目录下,创建独有的ansible.cfg文 件
- /etc/ansible/hosts 主机清单
- /etc/ansible/roles/ 存放角色的目录
4.2 主配置文件
Ansible 的配置文件可以放在多个不同地方,优先级从高到低顺序如下
ANSIBLE_CONFIG            #环境变量
./ansible.cfg                    #当前目录下的ansible.cfg
~/.ansible.cfg                  #当前用户家目录下的.ansible.cfg
/etc/ansible/ansible.cfg  #系统默认配置文件
Ansible 的默认配置文件 /etc/ansible/ansible.cfg ,其中大部分的配置内容无需进行修改
[defaults]
#inventory      = /etc/ansible/hosts        #主机列表配置文件
#library        = /usr/share/my_modules/    #库文件存放目录
#remote_tmp     = ~/.ansible/tmp              #临时py命令文件存放在远程主机的目录
#local_tmp      = ~/.ansible/tmp                  #本地临时命令执行目录
#forks          = 5                                            #默认并发数
#sudo_user      = root                                   #默认速度用户
#ask_sudo_pass = True                                 #每次执行ansible命令是否询问ssh密码
#host_key_checking = False                          #检查对应服务器的host_key,建议取消此行注释,实现第一次连接自动信任目标主机
#log_path = /var/log/ansible.log                  #建议开启 日志文件存放目录
#module_name = command                         #默认的模块 可以修改为shell模块

[privilege_escalation]                                     #普通用户提权配置
#become=True
#become_method=sudo
#become_user=root
#become_ask_pass=False
4.3 Ansible相关工具
- /usr/bin/ansible 主程序,临时命令执行工具
- /usr/bin/ansible-doc 查看配置文档,模块功能查看工具,相当于man
- /usr/bin/ansible-playbook 定制自动化任务,编排剧本工具,相当于脚本
- /usr/bin/ansible-pull 远程执行命令的工具
- /usr/bin/ansible-vault 文件加密工具
- /usr/bin/ansible-console 基于Console界面与用户交互的执行工具
- /usr/bin/ansible-galaxy 下载/上传优秀代码或Roles模块的官网平台
4.4 ansible命令执行过程
- 加载自己的配置文件,默认/etc/ansible/ansible.cfg
- 加载自己对应的模块文件,如:command
- 通过ansible将模块或命令生成对应的临时py文件,并将该文件传输至远程服务器的对应执行用户$HOME/.ansible/tmp/ansible-tmp-数字/XXX.PY文件
- 给文件+x执行
- 执行并返回结果
- 删除临时py文件,退出
五. Ansible常用模块
5.1 Command模块
功能:在远程主机执行命令,此为默认模块,可忽略-m选项
注意:此命令不支持 $VARNAME < > | ; & 等,可能用shell模块实现注意:此模块不具有幂等性
范例:
[root@master ansible]# ansible all -m command -a 'cat /etc/centos-release'
10.46.40.183 | CHANGED | rc=0 >>
CentOS Linux release 7.6.1810 (Core)
10.46.74.222 | CHANGED | rc=0 >>
CentOS Linux release 7.6.1810 (Core)

[root@master ansible]# ansible all -m command -a 'ls /root/'
10.46.74.222 | CHANGED | rc=0 >>
test
10.46.40.183 | CHANGED | rc=0 >>
test
5.2 Shell模块
功能:和command相似,用shell执行命令,支持各种符号,比如:*,$, >
注意:此模块不具有幂等性
范例:
[root@master ansible]# ansible all -m shell -a 'echo $HOSTNAME'
10.46.40.183 | CHANGED | rc=0 >>
node02
10.46.74.222 | CHANGED | rc=0 >>
node01

[root@master ansible]# ansible all -m shell -a "echo 'hello' > /root/test && cat /root/test"
10.46.74.222 | CHANGED | rc=0 >>
hello
10.46.40.183 | CHANGED | rc=0 >>
hello
5.3 Script模块
功能:在远程主机上运行ansible服务器上的脚本(无需执行权限)
注意:此模块不具有幂等性
范例:
[root@master ansible]# ansible all -m script -a ./test.sh
10.46.74.222 | CHANGED => {
    "changed": true,
    "rc": 0,
    "stderr": "Shared connection to 10.46.74.222 closed.\r\n",
    "stderr_lines": [
        "Shared connection to 10.46.74.222 closed."
    ],
    "stdout": "10.46.74.222 \r\n",
    "stdout_lines": [
        "10.46.74.222 "
    ]
}
10.46.40.183 | CHANGED => {
    "changed": true,
    "rc": 0,
    "stderr": "Shared connection to 10.46.40.183 closed.\r\n",
    "stderr_lines": [
        "Shared connection to 10.46.40.183 closed."
    ],
    "stdout": "10.46.40.183 \r\n",
    "stdout_lines": [
        "10.46.40.183 "
    ]
}
5.4 Copy模块
功能:从ansible服务器主控端复制文件到远程主机
注意: src=file 如果是没指明路径,则为当前目录或当前目录下的files目录下的file文件
[root@master ansible]# ansible all -m copy -a "src=./test.sh dest=/root/test.sh owner=root


#指定内容,直接生成目标文件
[root@master ansible]# ansible websrvs -m copy -a "content='test line1\ntest line2\n' dest=/tmp/test.txt"

#复制/etc目录自身,注意/etc/后面没有
[root@master ansible]# /ansible websrvs -m copy -a "src=/etc dest=/backup"

#复制/etc/下的文件,不包括/etc/目录自身,注意/etc/后面有/
[root@master ansible]# ansible websrvs -m copy -a "src=/etc/ dest=/backup"
5.5 Ger_url模块
功能: 用于将文件从http、https或ftp下载到被管理机节点上
常用参数如下:
url: 下载文件的URL,支持HTTP,HTTPS或FTP协议
dest:  下载到目标路径(绝对路径),如果目标是一个目录,就用服务器上面文件的名称,如果目标设置了名称就用目标设置的名称
owner:指定属主group:指定属组mode:指定权限
force:  如果yes,dest不是目录,将每次下载文件,如果内容改变,替换文件。如果否,则只有在目标不存在时才会下载该文件
checksum: 对目标文件在下载后计算摘要,以确保其完整性
#示 例 : checksum="sha256:D98291AC[...]B6DC7B97", [checksum="sha256:http://example.com/path/sha256](http://example.com/path/sha256sum.txt)sum.txt"
url_username: 用于HTTP基本认证的用户名。 对于允许空密码的站点,此参数可以不使用`url_password'
url_password: 用于HTTP基本认证的密码。 如果未指定`url_username'参数,则不会使用`url_password'参数
validate_certs:如果“no”,SSL证书将不会被验证。 适用于自签名证书在私有网站上使用
timeout: URL请求的超时时间,秒为单位
范例:
ansible all -m get_url -a 'url=http://nginx.org/download/nginx-1.18.0.tar.gz dest=/usr/local/src/nginx.tar.gz'
5.6 Fetch模块
功能:从远程主机提取文件至ansible的主控端,copy相反,目前不支持目录
范例:
[root@master ansible]# ansible all -mfetch -a 'src=/etc/redhat-release dest=/data/os'

[root@master ansible]# tree /data/os/
/data/os/
├── 10.46.40.183
│   └── etc
│       └── redhat-release
└── 10.46.74.222
    └── etc
        └── redhat-release

4 directories, 2 files
5.7 File模块
功能:设置文件属性,创建软链接等
范例:
#创建空文件
ansible all -m file -a 'path=/data/test.txt state=touch' ansible all -m file -a 'path=/data/test.txt state=absent' ansible all -m file -a "path=/root/test.sh owner=wang mode=755"

#创建目录
ansible all -m file -a "path=/data/mysql state=directory owner=mysql group=mysql"

#创建软链接
ansible all -m file -a 'src=/data/testfile	path|dest|name=/data/testfile-link state=link'

#创建目录
ansible all -m file -a 'path=/data/testdir state=directory'

#递归修改目录属性,但不递归至子目录
ansible all -m file -a "path=/data/mysql state=directory owner=mysql group=mysql"

#递归修改目录及子目录的属性
ansible all -m file -a "path=/data/mysql state=directory owner=mysql group=mysql recurse=yes"
``
5.8 Unarchive模块
功能:解包解压缩
实现有两种用法:
- 将ansible主机上的压缩包传到远程主机后解压缩至特定目录,设置copy=yes
- 将远程主机上的某个压缩包解压缩到指定路径下,设置copy=no
常见参数:
copy:默认为yes,当copy=yes,拷贝的文件是从ansible主机复制到远程主机上,如果设置为copy=no,会在远程主机上寻找src源文件
remote_src:和copy功能一样且互斥,yes表示在远程主机,不在ansible主机,no表示文件在ansible主机上
src:源路径,可以是ansible主机上的路径,也可以是远程主机(被管理端或者第三方主机)上的路径,如果  是远程主机上的路径,则需要设置copy=no
dest:远程主机上的目标路径mode:设置解压缩后的文件权限
ansible all -m unarchive -a 'src=/usr/local/src/nginx.tar.gz dest=/usr/local copy=no'

ansible all -m unarchive -a 'src=./file/nginx-1.18.0.tar.gz dest=/tmp copy=yes'
5.9 Archive模块
功能:打包压缩保存在被管理节点
范例:
ansible all -m archive -a 'path=/var/log/ dest=/data/log.tar.bz2 format=bz2 owner=root mode=0600'
5.10 Hostname模块
功能:管理主机名
范例:
ansible node1 -m hostname -a "name=websrv"

ansible 10.0.0.18 -m hostname -a 'name=huhuhahei'
5.11 Cron模块
功能:计划任务
支持时间:minute,hour,day,month,weekday
范例:
ansible all -m cron -a "minute=* weekday=1,4,5 job='/usr/bin/wall warnging' name=warn"

#禁用计划任务
ansible all -m cron -a "minute=* weekday=1,4,5 job='/usr/bin/wall warnging' name=warn disabled=yes"

#删除计划任务
ansible all -m cron -a "state=absent name=warn"
5.12 Yum模块
功能:
yum 管理软件包,只支持RHEL,CentOS,fedora,不支持Ubuntu其它版本
apt 模块管理 Debian 相关版本的软件包
范例:
#安装vsftpd
ansible all -m yum -a "name=vsftpd"

#卸载
ansible all -m yum -a "name=vsftpd state=absent"

#安装网络中的rpm包
ansible all -m yum -a "name=https://mirror.tuna.tsinghua.edu.cn/zabbix/zabbix/5.2/rhel/7/x86_64/zabbix-agent-5.2.5-1.el7.x86_64.rpm validate_certs=no"

#清除缓存安装软件包
ansible all -m yum -a "name=dstat update_cache=yes"

#查看所有安装包
ansible all -m yum -a "list=installed"
5.13 Service 模块
功能:管理服务
范例:
#启动服务并开机自启
ansible all -m service -a "name=httpd state=started enabled=yes"

#关闭服务
ansible all -m service -a "name=httpd state=stopped enabled=yes"
5.14 User模块
功能:管理用户
范例:
#创建用户
ansible all -m user -a 'name=user1 comment="test user" uid=2048 home=/app/user1 group=root'

ansible all -m user -a 'name=nginx comment=nginx uid=88 group=root groups="root,daemon" shell=/sbin/nologin system=yes create_home=no home=/data/nginx non_unique=yes'

#删除用户
ansible all -m user -a 'name=nginx state=absent remove=yes'
5.15 Group模块
功能:管理组
范例:
#创建组
ansible all -m group -a 'name=nginx gid=88 system=yes'

#删除组
ansible all -m group -a 'name=nginx state=absent'


